

Knitting, much like music, painting, and crocheting, comes with its own language with a mountain of terms and abbreviations that might leave you wondering, “How in world do I read this!?“
Even though I have been knitting for over a decade, I still crack open patterns, gape at the language, and wait as my brain deteriorates in real time!
The good news is that patterns these days are actually much easier to read than they were even ten years ago. Being able to read a pattern first depends on if you understand the basic terminology and abbreviations, which you can find here. Without understanding the terms and abbreviations, reading a knitting pattern is impossible. However, don’t despair! Once you know them, reading a pattern will become second nature!
Why use a pattern?
Knitting is no longer a stereotypical granny sport associated with over the top mishmash sweaters, odd color combinations, and wonky bonnets.
Knitting has been revamped to include stylish cardigans, crop tops, fingerless gloves, and a host of other creative projects with endless yarn possibilities.
A pattern will not only help you create your dream garment, but will also ensure your pieces are in proportion. Patterns come with specific directions for the size, shape, materials, and care.

Vogue Knitting Winter 2006/2007 #9

Wool and the Gang

Cardigang
My favorite places to get quality patterns with easy to read instructions are Vogue Knitting, Wool and the Gang, Ravelry, and independent sellers on Etsy. I also love to purchase vintage patterns from 1980s magazines and books.
Knitting Abbreviations
The table below describes the most common knitting abbreviations seen in patterns. If you are starting off as a beginner, you will mainly need to know the following abbreviations: beg, cont, g-st, k, LH, p, pat, and RH. These terms are what you will see minimally for most beginner friendly patterns. However, familiarize yourself with the other abbreviations. Eventually, you will want to create something more challenging and interesting that requires more skills.
| KNITTING ABBREVIATIONS | |
| approx | approximately |
| beg | begin or beginning |
| CC | contrasting color |
| ch | chain |
| cm | centimeter(s) |
| cn | cable needle |
| cont | continue |
| dec | decrease |
| dpn | double-pointed needles |
| foll | following |
| g-st | garter stitch |
| g | gram(s) |
| Inc | increase |
| k | knit |
| LH | left hand |
| lp(s) | loop(s) |
| m | meter(s) |
| mm | millimeter(s) |
| MC | main color |
| M1 | make one |
| M1 p-st | make one purl stitch |
| oz | ounces |
| p | purl |
| pat | pattern |
| pm | place marker |
| psso | pass slip stitches over |
| rem | remaining |
| rep | repeat |
| RH | right hand |
| RS | right side |
| rnd(s) | round(s) |
| SKP | slip 1 stitch, knit 1, pass slipped stitch over the knitted stitch (decreases 1 stitch) |
| SK2P | slip 1 stitch, knit 2 together, pass slipped stitch over the knit 2 together stitches (decreases 2 stitches) |
| sl | slip |
| sl st | slip stitch |
| ssk | slip, slip knit |
| sssk | slip, slip, slip knit |
| st(s) | stich(es) |
| St st | stockinette stitch |
| tbl | through back loop(s) |
| tog | Together |
| WR | wrong side |
| wyib | with yarn in back |
| wyif | with yarn in front |
| yd | yard(s) |
| yo (yfwd, yon, yrn) | yarn over needle |
| * | repeat the directions following the * as indicated in the pattern |
| [ ] | Repeat the directions inside of the brackets as indicated in the pattern |
How to Read a Knitting Pattern
Knitting patterns will give you information for the following:
- Materials
- Measurements
- Notes for specific details
- Instructions for knitting the garment.
They are organized first by what you need to complete the pattern, then followed by the directions for the piece itself.

In the photo on the left, the name of the pattern is given with the yarn weight expressed in the photo.
Knitted measurements are given to show how large the piece will be. Always measure yourself or the person you are knitting for to ensure your project will fit.
Materials are given to show how many grams of yarn are required and which needles are required to obtain the correct gauge. You don’t have to use the yarn featured in a pattern; some yarns are incredibly expensive, and some may be unavailable to you. In this example, DiVe/LBUSA Fiamma yarn is no longer available for sale. Ice Yarns Classic Wool Bulky can be used as a substitute since the gauge is the same at 12 stitches per row on a 4×4″ (10x10cm) swatch.
The gauge is the swatch of fabric you have to knit to ensure the measurements are correct. Everyone knits at different tensions, so you may have to go up or down a needle size for an accurate gauge.
Steps for Reading Patterns
STEP ONE: READ THE PATTERN

Seriously, read the pattern! Many knitters (me included) are intimidated by a pattern before they even read it! OR, the pattern is so beautiful that we go out and purchase the expensive luxury yarn required to make it, only to find out later that the pattern is just too advanced at this point in time. I was guilty of all of this when I first started out. Patterns are going to feel like a different language, but when you read the pattern slowly, the terms begin to come together and eventually make sense.
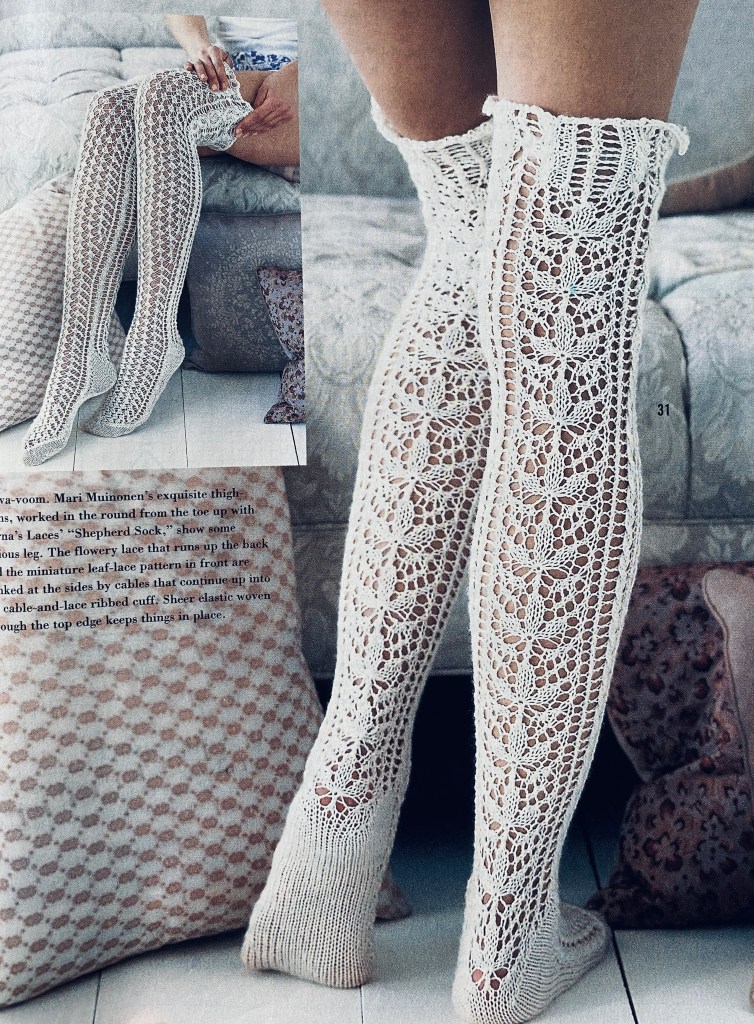
Vogue Knitting Spring/Summer 2009
Back in 2009, I once bought what I needed to make these incredible lace stockings… only to realize I had no idea what I was doing.
To make things even more confusing, half of the pattern wasn’t even in the magazine. I had to print the rest online, which consisted of two very complex lace charts.
The moral of the story is, read the pattern. If you don’t understand it the first time, read it ten more times. If you are unsure of a term, a quick internet search will present you with an explanation and perhaps even a video.
I found that reading the pattern multiple times truly helps to unravel some of the more confusing parts of a pattern.
STEP TWO: READ THE MEASUREMENTS AND CHECK YOUR GAUGE
Now, to be honest, I hate this part of the pattern reading process. It can be very time consuming and it stinks to have to constantly read and knit sometimes multiple sample swatches before we can start our project. I mean…,we’ve got our gorgeous yarn, and our gorgeous pattern, so now all that’s left to do is knit it up! Right?
Unfortunately, no. It is vital to READ THE PATTERN and make sure the measurements in the gauge are correct and that we are knitting the correct size. My knit garments didn’t start fitting right until I started checking my gauges.


In our sample gauge, the instructions say that 12 stitches on a needle with 16 rows of knitting will equal 4″/10cm. So, you would actually knit a square (swatch) using the recommended yarn and needles, then place a ruler from edge to edge to measure the length and width of the swatch.
St st (stockinette stitch) is always used to knit the sample swatch for the gauge. Without the correct gauge, your project will not be the correct size.
Adjust your needle size until the correct tension is achieved. This means, if your swatch is larger than the required size, switch to needles the next size down. If your swatch is smaller than the required size, switch to the needles the next size up.
STEP THREE: READ AND IDENTIFY EACH SEGMENT
Patterns will typically be broken down into segments or parts. For most patterns (unless they are simple hats and scarves), bold or capital lettering is used to identify the segment being worked on in the pattern. Segments include pieces such as the front, back, sleeves, collar, pockets, toe, foot, gusset, or leg. There are more pieces depending on what you are knitting.

In our sample pattern on the left, the highlighted headings show the sections to be worked on.
Everything is meant to be knitted in order, so if you are knitting those fancy lace stockings, after thoroughly reading the knitting measurements, materials, and gauge, you will begin with the TOE, and not the FOOT or the GUSSET.
As an added bonus, a Stitch Glossary may be available on your pattern to help you identify less known abbreviations.
Some patterns, especially patterns with lace or a lot of cables, come with charts.
Patterns will indicate which chart you should begin with first.

In this sample for a knit jacket, you can see the final measurements for the piece as well as the charts needed to complete the cable pattern.
Charts will have a stitch key to tell you whether to knit, purl, etcetera. Each box on the chart indicates a separate stitch. The rows begin at the bottom where it says number “1.”
4-st RC means 4 stitch Right Cross, which is a cable, a well known textured pattern that results in a rope-like pattern.
4-st LC means 4 stitch Left Cross, which is the same as a 4-st RC, except the stitch crosses over on the left hand side.
When in doubt, choose another pattern
If a pattern is just painfully confusing, sometimes there really are problems with how they are written. Not all patterns are written clearly, and not all patterns use the correct terms and abbreviations. When this happens, don’t be afraid to try something easier or different.
Knitting should be fun and relaxing, not stressful. If a pattern is stressful, is it really worth knitting? If garter stitch scarves are all you have the patience for, then enjoy knitting that scarf for all your knitting days!
MORE POSTS LIKE THIS
I Sewed an Outfit Using 18th Century Reproduction Fabric
Colonial Williamsburg Part 5: Tarpley, Thompson & Company Haul


